I’m dusting off my white coat and back to med school as an MS3 after years of grad school!
New posts will get back to the original med school beast focus.
Unconventional strategies to slay med school and make a few bucks in cryptocurrency
I’m dusting off my white coat and back to med school as an MS3 after years of grad school!
New posts will get back to the original med school beast focus.
Shimadzu LabSolutions Postrun software isn’t always the easiest to use, and the funky translations from the Japanese version don’t help. After a few years using it, I’m sharing what I’ve learned in a quick guide to some of the most important and commonly-used functions for any analyst.
Often, you’ll want to get a trace of when a specific ion’s m/z is seen over time. Basically, you’ll want to extract a chromatogram (signal over time) for a specific ion from all the data. This is in contrast to a Total Ion Chromatogram (TIC), which sums up the total number of counts for all ions with any m/z, and displays it over time. The TIC lets you know when there’s a peak, but it can be misleading if you’re using a dirty column, have impurities from the vials/septa/mobile phases that fly well, etc, and it may obscure small peaks that you are interested in if they are low abundance or don’t ionize well.
Under MS Data, just click “Data View Parameters” in the top left of the sidebar. From there, just type in the desired m/z values. “Event” refers to the polarity — for positive mode, it’s “1” on our system, and “2” for negative. Feel free to get a bunch of EICs for everything you’re interested in using either polarity, and look for many adducts like [M+H]+, [M+Na]+, etc.
If you have many samples you analyzed, select the rows of the MS Data View Parameters window, copy (ctrl-C), and you can paste them into the MS Data View Parameters window of your other data files.
EICs will be displayed below the TICs in the Chromatogram View. If you save the data file, they’ll still be there when you reopen it (i.e., it saves your “MS Data View Parameters” settings).


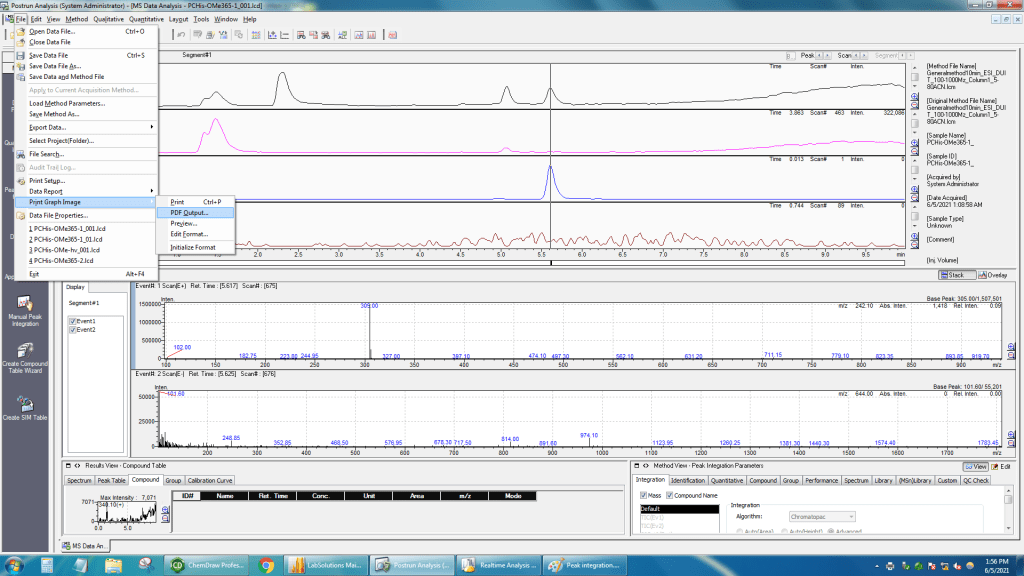
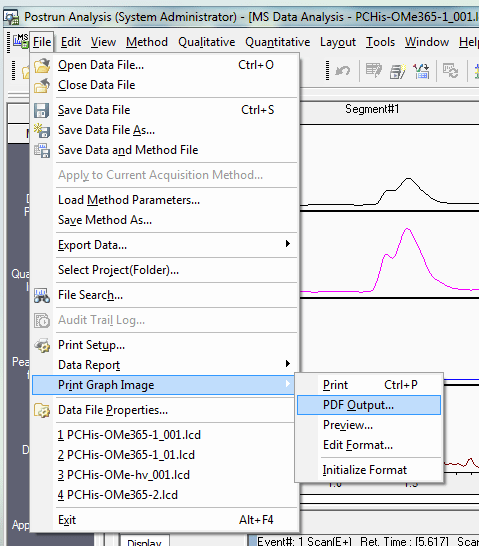
LabSolutions has a powerful (yet clunky) report editor that lets you generate whatever report you want, complete with chromatograms, mass spectra, methods info, annotations, etc. However, often you just want to get a quick export of chromatograms and a mass spectrum if you’re just characterizing a compound. For an LC-MS analysis, you may also want some EICs and peak heights (areas are harder — see next section). To get this done without having to click around in the report editor, you simply use the “Print Graph Image” command. This can quickly export a PDF that will have the chromatograms you have displayed, and the mass spectra you have up (one positive, one negative). The mass spectra will be from the positive and negative scans taken at the time where the vertical line is positioned on the chromatograms (controlled by double-clicking, or clicking the Scan < or > buttons.
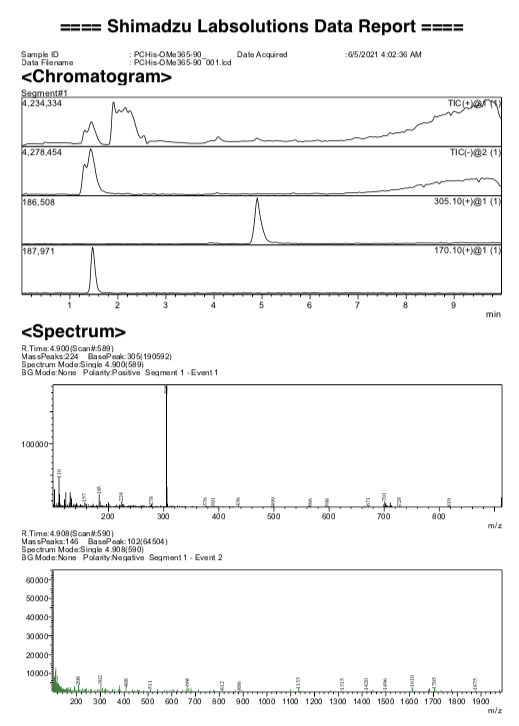
Here’s an example report that it’ll generate and let you Save As with a single click. Note that it gives a peak height for each EIC. Peak height should be fine for quantification, though it is not considered as sensitive as integrating the peak area (see part 3).
If you use the actual report editor, you can customize everything more. Some key options in this editor to know about are that when you double-click on a mass spectrum:
Integrating peak areas in LabSolutions is possible, but pretty clunky. However, it can give you more sensitivity than peak height for quantitative analysis.
Here’s how to do it:


2. Click the “integration” tab. I think you have to pick the compound you want, then move to the area to the left (Results View), click the “Compound” tab, and right-click to perform “Peak integration for All IDs”


3. You can also try the “Peak Table” tab on the left and toggling back-and-forth between “View” and “Edit” on the far right, and possibly changing peak width in the settings in the “integration” tab. But be sure you are using consistent integration parameters for all samples.


Once you have your data, I think you have to copy/paste or type it into its final destination (spreadsheet, etc).
I hope these tips help you in your research!
YetiCold or YetiWallet is a great way to store your bitcoin on your own. There is a great video walkthrough about how to do the wallet creation, and the instructions within Yeti guide you through this process pretty clearly. However, after that, you’re instructed to erase your entire machine, and it’s up to you to get your wallet back afterwards! I was a little nervous about doing this, and didn’t want to start sending coins to this wallet until I could be sure I knew how to get the wallet back after wiping the machine. So I decided to test it. I deleted my wallet, and tried recovering it.
This is how to get your wallet back using 3 of your 7 seeds. It also has a bit more explanation about how the 3 of 7 multisig wallet is set up, how wallet files work in Bitcoin Core, and what all the text at the bottom of each seed file is.
Bitcoin core keeps your wallet in a file called Wallet.dat in the hidden .bitcoin folder in your home directory. This wallet file has to be present for you to use your wallet and spend your coins. While it is gone (i.e., after you wipe your machine), you can still receive coins at a previous address generated with the wallet. The blockchain will remember that those coins are there for you. But what happens when you want to regenerate/recover the wallet so you can spend them?
Remember that YetiCold generates your seven seeds, and an additional file called “Descriptor.txt.” Descriptor.txt contains a very long string of letters and numbers that explains how all the seeds fit together so that 3 of the 7 can be used to regernate the wallet. This string from Descriptor.txt is copied at the end of each seed. So that way, each seed carries the instructions about how it fits together with the other seeds. Basically, to recover a wallet, you just load up a seed into YetiCold so it can pull the descriptor out of it. Then, you load up three seeds in succession. It will then rescan for a few minutes, and you’ll then have your wallet back. Here’s how it’s done:
Run YetiCold. This can be accomplished by opening Terminal, and running the following commands to enter the directory where YetiCold is stored, then starting it using Python3 to run initialize.py, specifically with the YetiLevelTwo version:
cd yeticold
python3 initialize.py YetiLevelTwo
YetiCold will open. From here, you just need to go to “Recover Wallet.”

You now need to download the blockchain and have your computer validate it. This will take at least overnight (with an SSD), and may take several days (with an HDD). YetiCold will wait around until this is complete. You can do this ahead-of-time so it’s ready without compromising security.
Next, Yeti will ask you to load up a seed (any seed!) so it can pull the descriptor. Just browse for the file (on your CD, or copied onto a device — careful!)

Finally, you’ll have to import any 3 of your seven seeds similarly. Put each CD in and browse to it and it’ll load them up. Each phrase will turn green once it’s validated.

After that, you’ll hit next. It’ll rescan for a few minutes, and then you’ll have your wallet recovered. If your blockchain is synced, it’ll know what your balance is (with all the coins received).
1. Skim https://medschoolbeast.com/2021/03/09/cryptocurrency-bitcoin-ethereum-nfts-defi-and-more/ (high level overview)
2. Set up Coinbase account. Use “Earn” thing to get like $100 total of free coins (they have you watch short videos and take easy quizzes about the coins and you get like $3 for each answer; there are cheat sheets online)
3. If you actually want to buy anything, use Coinbase Pro NOT Coinbase. If you made a Coinbase account, you automatically have a Pro account already (pro.coinbase.com). Main reason is that Coinbase Pro gives you about 3-4% more coins for your money cuz their fees are lower. Transferring to/from Coinbase and Pro is free/instant.
4. Then there is the question of what to buy right now. No easy answer, many things are at all time highs. Personally I would say you want your portfolio to be about 50% ETH, 30% BTC, 20% everything else (good stuff like LINK, MATIC, and AAVE). BTC has been taking a nap this week so maybe nibble a little if it gets to the low $50k range. Long-term, ETH is its cooler younger bro that actually does stuff (DeFi, NFTs, etc) and I am pretty bullish on it, but it’s near all-time highs so hard to justify buying until it dips a little. Another option I would consider in your case is just having some money sitting in “crypto cash equivalents” and earning interest, and then you can quickly use this to buy a crypto when you want. Problem is Coinbase is easy to buy/sell but they pay little to no interest. You would have to start another account somewhere else to get interest. Best choices:
Yes 30-40% interest (annualized) is possible right now on stablecoins. I don’t understand why people continue to talk about their CDs and “high yield savings accounts” at a bank — you are locking in a loss of real money (against inflation). Most banks = dumb/corrupt old boomers whereas crypto is an amazing opportunity for smart young people that does not discriminate. Not to editorialize too much.
Careful w/ transferring assets. Fees on USDT/USDC transfers are high right now like $20. Lower for other blockchains like $0.04. Always copy and paste addresses carefully and double-check them. For sending large amounts, do a small test transaction first before sending the rest in 1-2 chunks.
Don’t buy: stupid meme coins near all-time highs (DOGE), dumb centralized scam projects (XRP, ADA, XLM).
Careful w/ scams (anyone saying “Send me 1 I’ll send you 2 back!” or obv anyone asking for passwords) and don’t get overhyped about most dumb new projects.
If you’re like me, you’re busy, and can always use a little bit of extra money in your pocket and your bank account. You also realize that exercise is an essential part of your life, and you need to do it to stay healthy, keep up your energy, and strengthen your immune system. Unfortunately, it can cost you some time and money to work out.
I found some ways to make a few bucks while getting a great workout in, defraying the cost of any exercise equipment and putting a few extra greenbacks in your pocket.
Cardio: bicycle Doordash or Postmates, or on-foot Postmates.
Sign up for Doordash (referral link: https://drd.sh/Eq8BJ2/). If you have a decent bicycle and are close to an urban area with bicycle-friendly streets, all you need to do is put the bag on your handlebars and let the deliveries roll. Generally, you can pull upwards of $20/hour, often significantly more if you pick a busy time with “peak pay” bonuses, a holiday, or a day with a bit of rain or drizzle (if you can stomach it). While you may have to wait around at restaurants, you’ll quickly figure out which restaurants “have it together” and the best times to do it in your area (generally lunch or dinner hour).
Unlike using a car, you won’t have expensive maintenance, gas, wear-and-tear, and insurance eating into your profit (which puts a lot of Doordash drivers in the red!).
It may also be worth checking out Postmates, which has both a bicycle option and an on-foot option for very busy cities.
Weights/other home workouts with frequent <1 min breaks: You’ll only earn ≤ $0.37 per workout with this one, but it’s better than nothing!
Bonus: Also run videos from https://hideout.co/ in the background — no constant clicking required (just a click every 3 h or so). The points can be cashed out to SwagBucks, or for even more points, cash them in on Gain.gg (this site also lets you convert them to cryptocurrency — a nice BlockChain Beast move!).
Conclusion: Use Doordash to get some cardio in, learn all the hot restaurants in town, and leave a smile on hungry people’s faces, and hit a few Swagbucks videos between sets when you’re lifting weights or doing body-weight exercises or something else at home that has frequent, short breaks. Next thing you know, you’ll add another “0” to your bank account!

If you have a Coinbase account, you also have a Coinbase Pro account. You can sign up here: https://www.coinbase.com/join/wesalo_i.
While Coinbase Pro looks a bit more intimidating and is harder to use, it’s pretty intuitive once you get the hang of it. The advantages are that you will pay way less for the same coin. This is because Coinbase has:
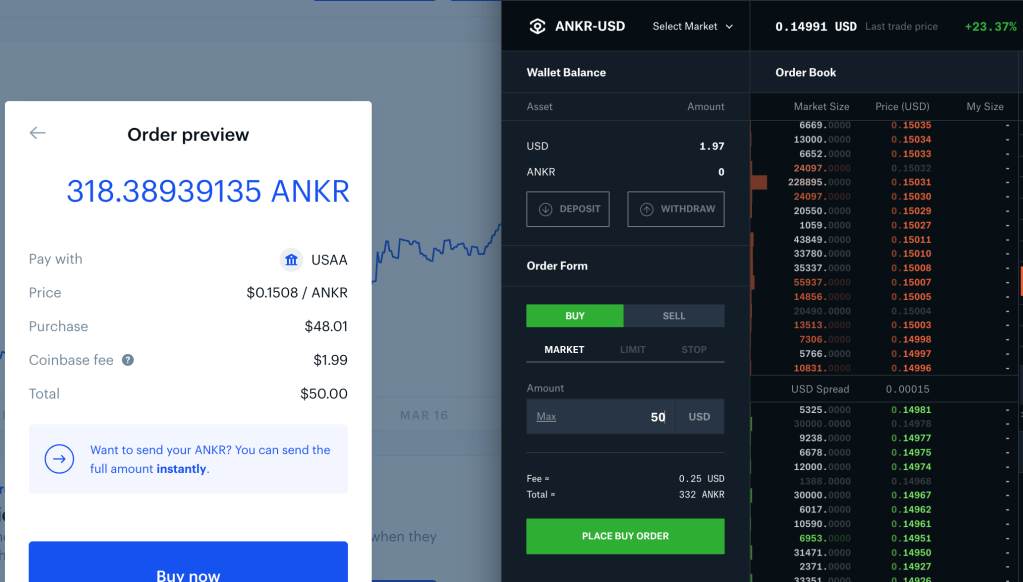
Don’t believe me? Here’s a buy order for ANKR set up on Coinbase (left) and Coinbase Pro (right) the other day.
For your $50, Coinbase will give you 318.4 ANKR tokens, but Pro will give you 332. Over 4% less! This is because you are facing a $2 fee vs $0.25 fee, and they are charging $0.1508 per coin vs $0.14991 per coin on Coinbase and Coinbase Pro, respectively!
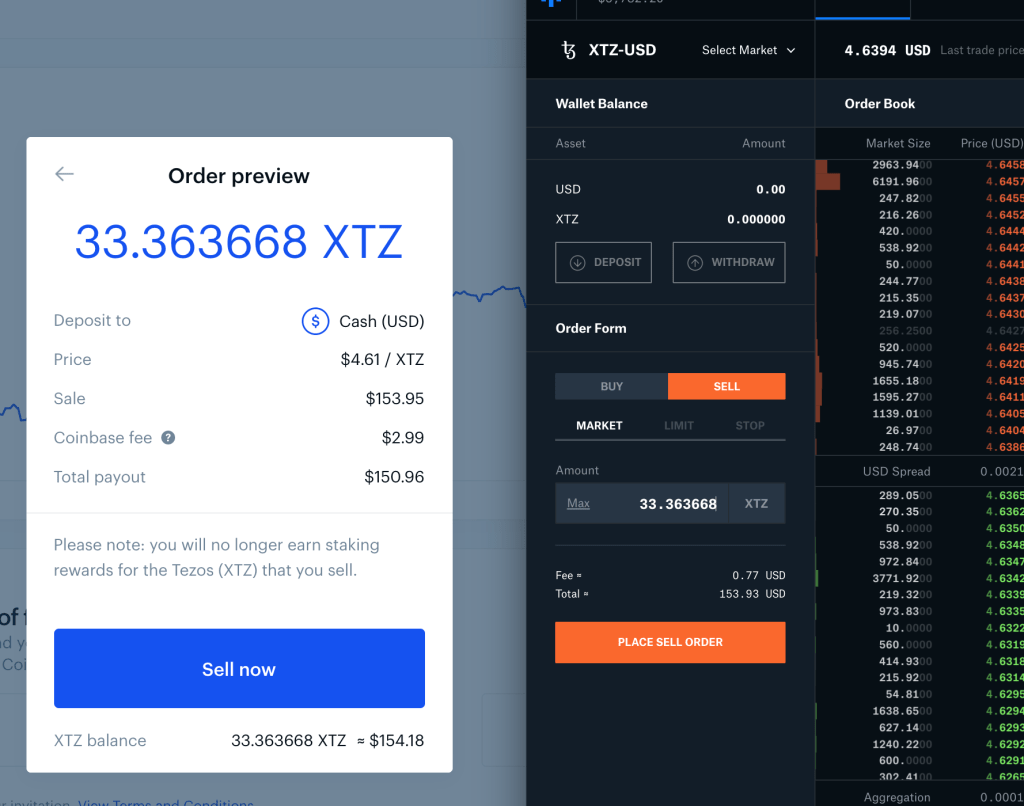
What if you want to sell? Well, here’s a Tezos (XTZ) sale from today. If I sell the same amount of Tezos, I can get $150.96 from Coinbase, or $153.93 from Pro — 2% more from Pro! This is because the fee is $3 on Coinbase vs $0.77 on Pro, and coin is being sold for $4.61 on Coinbase and $4.6394 on Pro for a nearly 3-cent spread.
The last advantage I’ll mention with Pro is being able to put in Limit orders. Limit orders let you set a price, unlike Market where you take what you can get. With market, you are hoping that the price doesn’t suddenly jump up when you click the button. Limit orders let you set the price a bit below where it’s currently being bought, or a bit above where it’s currently being sold. Depending on how much higher/lower you go, it’ll generally “jitter” up or down to your limit pretty quickly, and you’ll get your order filled on your terms. You can also set up these orders as a “set it and forget it” buy or sell, so the exchange will automatically buy or sell once it hits your price target.
For a few coins that earn interest, however, only Coinbase pays interest. These include XTZ, USDC, and ATOM. So after you buy these (preferably on Coinbase Pro), use Withdraw to instantly move them to Coinbase for free. Note that you can generally get higher interest yields on other platforms.
All in all, if you are one of the very many people who trades on Coinbase, you should simply move over to Coinbase Pro for your trading. You already have an account if you’re signed up for Coinbase — just go to pro.coinbase.com. And here’s a referral link to sign up for Coinbase if you’re interested: https://www.coinbase.com/join/wesalo_i

New coins coming to Coinbase Pro: ANKR, CRV, and STORJ
ANKR, CRV, and STORJ will be dropping soon. These three coins posted large 24-hour gains already: 56%, 24%, and 83%, respectively, diminishing my enthusiasm for them, though a further pump once trading opens on Coinbase Pro is likely. Coinbase Pro is the second-largest exchange by volume (about 9% of total crypto trading) and brings in lots of capital from the American market. So when trading starts, the market cap of these altcoins can grow significantly.
All three of these are fairly popular ERC-20 tokens running on the Ethereum blockchain. Curve DAO is a stalwart DeFi token with a lot of old-timey-looking liquidity pools. ANKR is a solution to make web3/blockchain development easy and accessible, and allow for staking. Storj is a decentralized cloud storage platform (similar to Filecoin, which has made huge gains recently but might be scammier). I don’t know a ton about these projects, but if Coinbase Pro thinks they’re worth a listing, they’re certainly worth checking out!
To get in early (before the crowd), you can use one of the following exchanges:
These are somewhat exciting listings, and it’s important to get into projects early if you want to achieve big returns. That said, many projects are flops, and all three of these projects have lots of competition from similar projects in the space.
Miami Heat partnering with FTX Exchange:
In other crypto-related news, this is interesting:

Uniswap v3:
Famed DeFi platform and decentralized ERC-20 exchange Uniswap remains one of the most popular platforms. It is a real gas-guzzler, often responsible for 30-40% of Ethereum transactions. This exchange won many hearts and minds when it famously airdropped $1,400 worth of its token (now worth $10k) to its early users — the original stimulus check!
Now Uniswap is announcing v3 features: https://twitter.com/Uniswap/status/1374407380520239109
They added significant customization for liquidity providers, allowing them to target a certain price range. Additional features include:
Flexible fee tiers: choose between 5bps, 30bps, or 100bps
Advanced oracles: return TWAPs in one transaction
Range Orders: LPs can sell for another along a smooth curve, similar to a fee earning limit order
It is exciting to see continued development in the space. However, users are still frustrated with the high gas fees for transactions. This is more of an Ethereum problem than a Uniswap problem. However, exchange aggregators like 1Inch and novel “2nd-layer” solutions like Loopring are aiming to help solve it. Alternative blockchains to Ethereum, like PolkaDot and the more controversial Binance Smart Chain (BSC; centralized) and Cardano (ADA; centralized and rather unproductive), are also hoping to supplant Ethereum. Ethereum, however, has a long head-start, and their top position is really theirs to lose. Either way, Uniswap’s token dropped about 7% in value today to $30, which is a key psychological barrier. Only time will tell if it pumps on the hype of their announcement, or if it tanks due to disappointment with the perceived failure to address the high gas fees.
